2012 Honda CBR250R/RA Valve Adjustment Procedure - Page 4
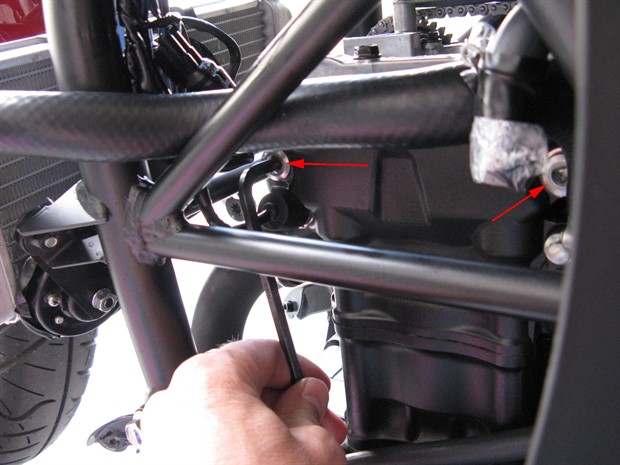
Prev26. Remove the bolt and copper sealing washer securing the rocker arm shaft for each pair of valves that need adjustment. The bolts are located on the left side of the cylinder head, one to the front, one to the back (see image below).
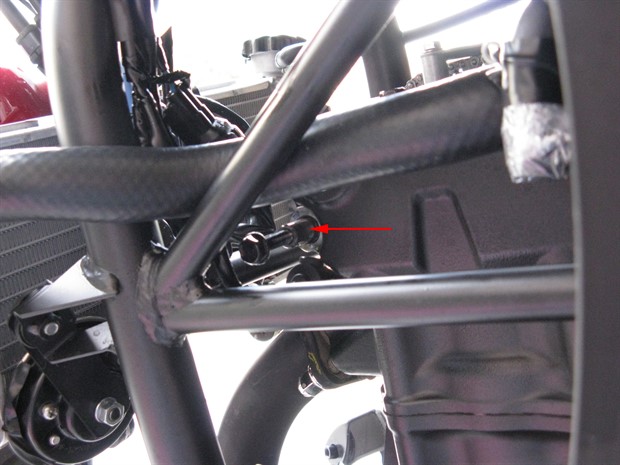
27. Use a 6 mm bolt about 3 cm long and thread it into the rocker arm shaft a bit and partially pull out the shaft until the rocker arm is free (see image below). The radiator mounting bolt is the correct size (at least for the exhaust).
28. Read this entire step before proceding. Slide the rocker arm away from the valves, and carefully use a magnet to remove each shim that you need to replace and note where it came from. Be careful not to drop a shim into the engine. You can pack or cover any passages, holes, nooks and crannies in the cylinder head with cloth / portions of shop towels to prevent a dropped shim from falling into the engine. Someone who has followed this documented procedure has suggested plugging the oil return hole in the head with a small screwdriver. I've been told that this hole, plus the opening that the cam chain passes through, are the only locations that a shim can fall through into the crankcase. I have not personally verified that there are only two locations, but it seems reasonable. If you were to drop a shim around a valve spring it could also be quite difficult to get it out even though it wouldn't fall into the crankcase. Be careful.
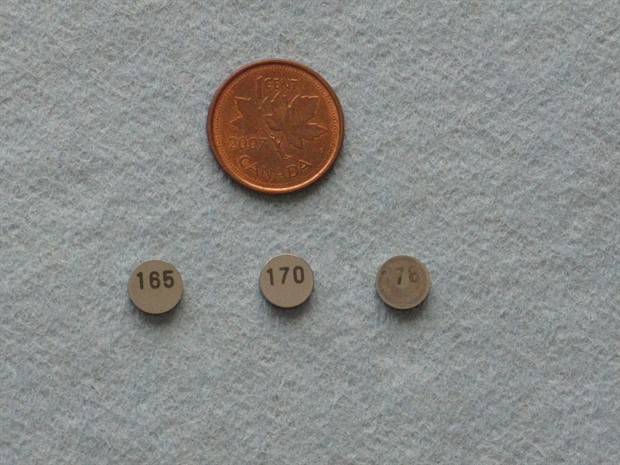
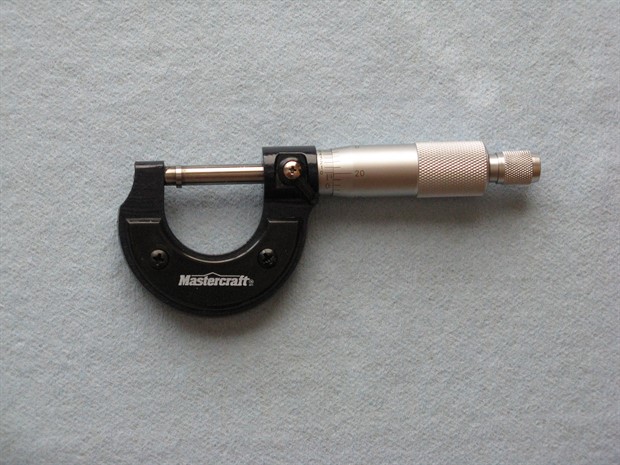
29. Measure the shim thickness with a micrometer and determine the size of the new shim that’s needed to obtain
the correct valve clearance (170 = 1.70 mm).
A = B - C + D
A = new shim thickness
B = measured valve clearance
C = specified valve clearance
D = old shim thickness
Shim thicknesses come in 0.025 mm increments. See images below.
30. Get the shims and any other parts you need if you don’t have them already.
31. Install the new shim(s) into the correct location. Again, be careful not to drop a shim into the engine. There is not a lot of room to get your hand / fingers in there. You can use tweezers to position the shim but make sure you can grip it securely (practice outside the engine first).
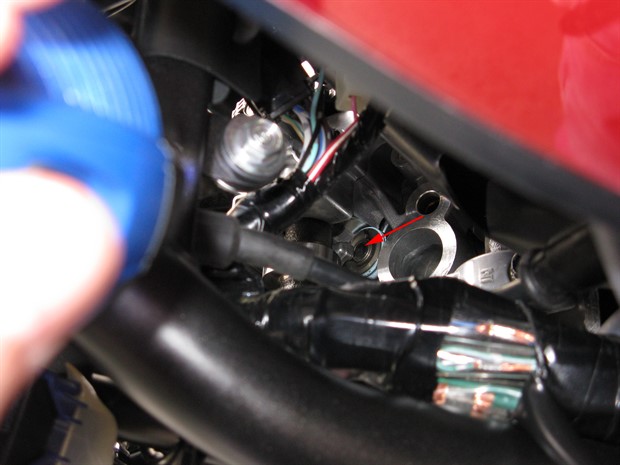
32. Reinstall the rocker arm shaft(s). You can use a magnet on the shaft end of the rocker arm to lift it up and to slide it towards the valves in order to align the hole in the rocker arm with the shaft (see image below). You can’t see the hole, so you have to do it by feel. Install the rocker arm shaft securing bolt(s) and a new (recommended) copper sealing washer(s), but do not tighten the bolt(s) yet.

33. Remove any shop towels or cloth from the engine that may interfere with any moving parts.
34. Drip some motor oil onto the camshaft lobes and rocker arms.
35. Rotate the crankshaft several times and align the marks as you did before. Measure the valve clearances again. If the valve clearances are out of spec, repeat the previous few steps, otherwise tighten up the rocker arm shaft securing bolt(s) (I couldn't find a torque spec in the service manual).
36. Make sure that you have not left any shop towels or anything else that does not belong in the engine. Use a mirror to see into all the nooks and crannies.
37. Clean the valve cover sealing surfaces, especially the half-circle cutouts in the cylinder head (remove all oil residue here - I used brake cleaner on a cloth).
38. Apply black liquid silicone sealant (suitable for valve covers) to the half-circular cutouts in the left side of the cylinder head. You don't need much.
39. The service manual states to use a new valve cover seal, but you may be able to re-use the old one if it is in good condition and you can remove the old silicone sealant from the half-circle regions. You’ll also want to remove any oil residue from the half-circle regions if you’re reusing the seal (I used dish soap and water).
The service manual states to insert the rubber valve cover seal into the groove of the valve cover and then install the valve cover, but I found that it is difficult to keep the seal in place while you are trying to get the valve cover over the radiator and through the frame tubes and into position (you can try taping the seal in place while positioning the valve cover, but be sure to remove the tape before tightening the valve cover bolts).
Alternatively you can just place the seal on the cylinder head and then position the valve cover. You can still lift the valve cover high enough above the cylinder head in order to get your hand in there to position the small circular portion of the seal over the alignment dowel and the larger circular portion of the seal around the spark plug hole in the valve cover.
40. Bolt the valve cover in place after making sure that the rubber seal is still in the correct position including around the spark plug hole and the alignment dowel next to it. You can use a small mirror to inspect the seal at the rear of the engine and see inside of the spark plug hole in the valve cover. Tighten the valve cover bolts to the correct torque – do not over tighten (the service manual specifies 10 N.m (7 lbf-ft), but you should verify this in the service manual yourself or ask at the service department of a Honda dealer).
41. Reconnect the previously removed hose to the PAIR valve.
42. Install the crankshaft hole cap and the timing hole cap. Verify that the o-rings are clean and in good condition.
Also verify the the seating surfaces for the o-rings are clean. Apply motor oil to the o-rings and the cap threads before
installing the caps. The service manual states to use new o-rings, but you can re-use the old ones if they're in good condition.
The service manual specifies the following torque values:
Timing hole cap: 6.0 N.m (4.4 lbf-ft)
Crankshaft hole cap: 8.0 N.m (5.9 lbf-ft)
I'm not sure how you would use a torque wrench on them, though.
43. Re-assemble the rest of the removed or repositioned parts in reverse order.
44. After running the engine, verify that there are no significant oil leaks and no coolant leaks. Check for leaks again after the bike has been ridden for a while. You're done.
Prev