2012 Honda CBR250RA Oil and Filter Change (Page 2) - Road and Trail guide
Also applicable to the Honda CRF250L, CRF300L, CRF300L Rally, CBR300R, CB300R, Rebel 300
Previous
1. Gather your tools, parts and supplies.
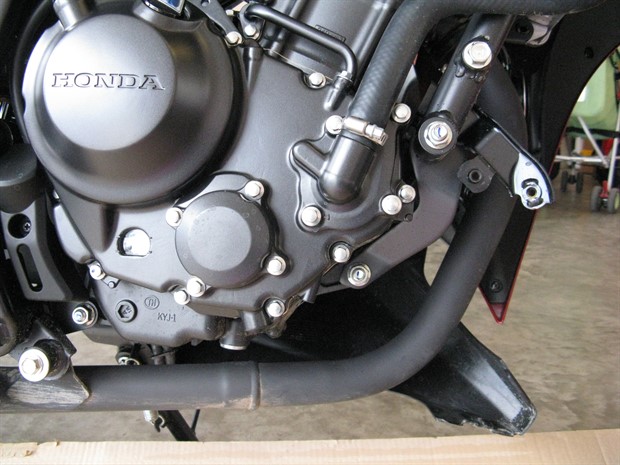
2. To access the oil filter on the CBR250RA, you'll need to remove the right-side middle cowling and right-side lower cowling (fastened with 2 bolts and a Philips screw). Refer to the CBR250RA valve adjustment article for information on removing the middle cowling. If you're only changing the oil, you won't need to remove any of the cowling.
For the CRF250L, CRF300L/LR and CB300R, you don't need to remove anything in order to access the oil drain bolt or the oil filter cover unless, perhaps, you have a skid plate or other accessories that impede access.
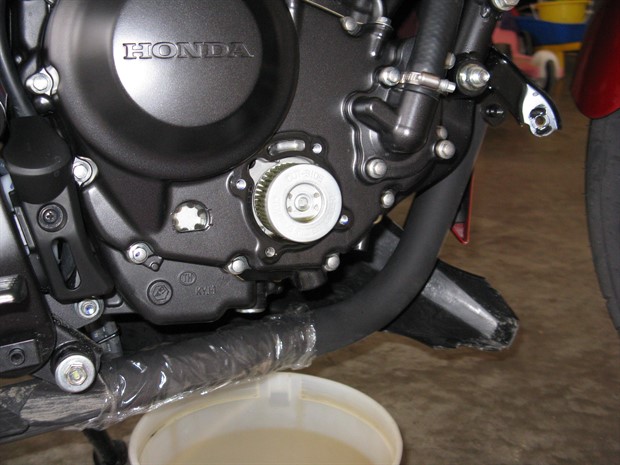
3. Clean around the engine oil drain bolt, oil filler cap and oil filter cover (small cover on right side of engine next to the oil level sight glass) first.
4. Run the bike for a few minutes or so to warm up the engine. This will allow the oil to drain better and to resuspend any sediment. Turn off the engine. Be careful not to touch the exhaust when hot.
5. Spread newspaper or cardboard under the bike.
6. Put on a pair of disposable gloves (nitrile). Used engine oil is toxic, so try to avoid skin contact.
7. Loosen the engine oil drain bolt (underside of engine) with a 12 mm socket and a ratchet or flex-bar. Place a drain pan underneath the drain bolt to catch the used oil.
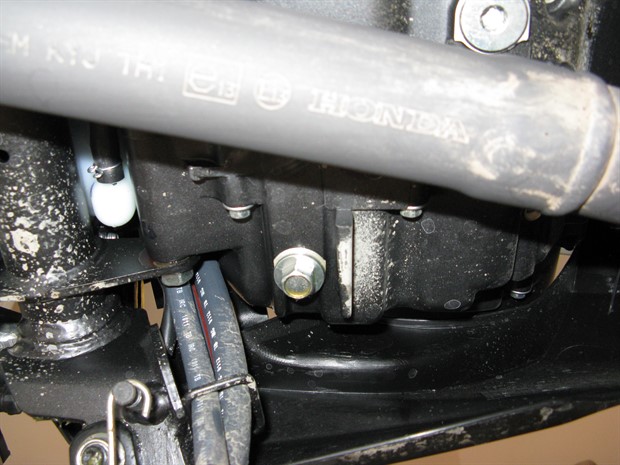
8. Remove the engine oil drain bolt and let the oil drain into pan. When you're unscrewing the drain bolt by hand, put a bit of upwards pressure on it. When you feel that it's completely unscrewed, quickly pull it down and to the side to try to avoid too much oil spilling onto your gloved hand. It’s easy to drop the oil drain bolt when removing it. Sometimes the crush washer lightly sticks to the engine case; be sure you remove the crush washer with the drain bolt; you can use a small flat-bladed screwdriver to loosen the washer after unscrewing the drain bolt a bit (don't use force and avoid scratching the seating surface around the drain hole). When the oil has almost stopped draining, tip the bike from side to side a bit to drain any remaining oil. Allow some time for the oil to drain.
9. Remove the oil filler cap. You can do so just after removing the oil drain bolt. Ensure that the O-ring is in good condition, otherwise you'll need to replace it. Clean the O-ring and the seating surface (underside) of the cap. Clean around the opening of the oil filler hole.
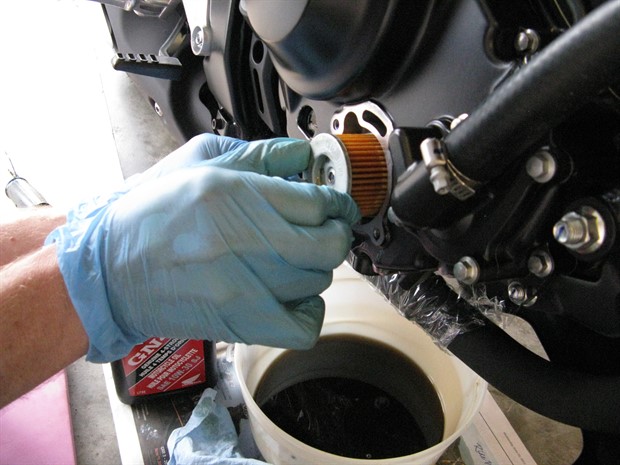
If you're going to change the oil filter too, you can proceed with that now, or you can reinstall the oil drain bolt first if it looks like the oil has finished draining. Instructions follow.
10. Clean the oil drain bolt (and the crush washer if reusing it). If using a magnetic drain plug, be sure to clean off the magnet. Clean off the seating surface around the oil drain hole. The service manuals state to use a new crush washer / sealing washer. I've reused some flat aluminum sealing washers over the years (after inspecting them to verify that they were still in good condition) without any issues. I always use a torque wrench when tightening a engine oil drain bolt. You'll have to make your own decision about reusing the flat crush washer. If in doubt, use a new one. If you buy OEM crush washers individually from a dealer, it will likely cost you quite a bit more than buying them in larger quantities from another source.
11. Apply engine oil to the oil drain bolt threads and seating surface (likely there will be oil on the threads and seating surface of the drain hole). Reinstall the oil drain bolt with a crush washer. Insert the drain bolt and tighten by hand (it should thread-in easy). Use an accurate torque wrench to tighten it to 24 N.m (18 lbf.ft). If you're using a beam-type torque wrench with markings on one side only, you can use a mirror resting on a small box or blocks of wood so that you can see the markings on the torque wrench. The mirror should be directly underneath the torque scale, and you should be looking at it straight-on. This is not an issue with click-type torque wrenches, but click-type torque wrenches may need to be calibrated from time to time.
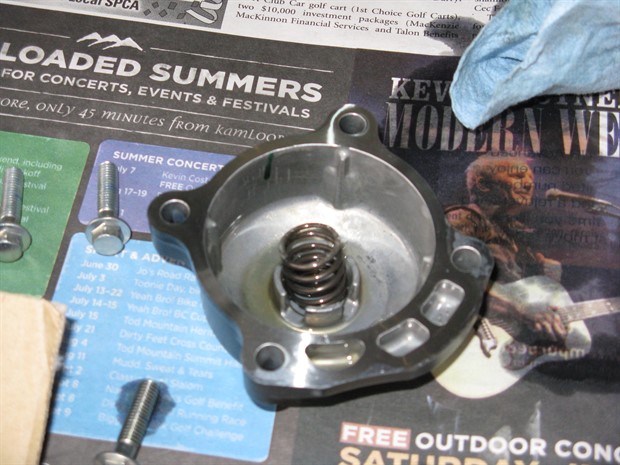
12. To change the oil filter, loosen and then remove the 4 bolts securing the oil filter cover. Some oil may dribble out (and make a mess), so I tape some paper to the engine cover below the oil filter cover to redirect the oil into the drain pan. There is a spring between the oil filter cover and the oil filter. The spring may be held by the oil filter cover. There is also a fiber gasket between the oil filter cover and the crankcase cover.
13. Remove the oil filter and inspect it for excessive metal particles and other debris. Compare the new oil filter to the old one. If you're using an oil filter magnet, remove it from the old filter and clean it. On some of our bikes we use magnetic drain plugs or an oil filter magnet.
14. Clean the sealing surfaces of the oil filter cover and the crankcase cover. Remove any gasket material (I've never had the gasket stick). Clean out any debris from where the oil filter resides. Clean the oil filter cover bolts and the bolt holes if oil seeped in. Generally, torque specs apply to clean, dry threads unless otherwise stated.

15. Inspect the gasket. If the gasket is not damaged, you can likely reuse it, otherwise use a new gasket. The service manual states to use a new gasket.
16.If you have not already done so, reinstall the oil drain bolt (see above).
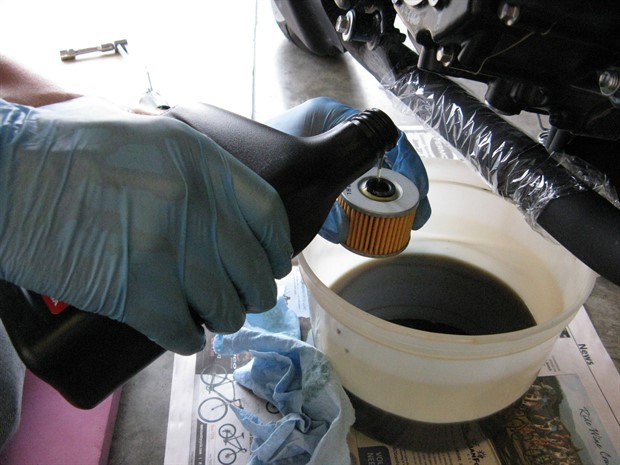
17. Install the new oil filter. I pour oil into the new oil filter before installing it to saturate the filter with oil, thus priming it. This is to reduce the amount of time to build up oil pressure and flow when starting up the engine. Some people say not to do this because the oil has not been filtered. I would think that new oil right out of the bottle is likely cleaner than it will ever be. I leave this up to you decide if you want to do this. Install the new oil filter with the “OUT-SIDE” mark facing outwards. This is critical. If you put it in backwards, you can ruin your engine. the "OUT-SIDE" mark may be absent on some Honda oil filters. The rubber seal and hole face inwards for this engine. Some of the oil you poured into the oil filter may dribble out if you're not quick.
18. Install the gasket, oil filter cover and the spring. You can do this all together in one go. Install the gasket between oil filter cover and engine cover in the correct position; it should be obvious which way it goes. Install the spring in the oil filter cover. There are “prongs” on the inside of the oil filter cover that help hold the spring in place. If you're having problems, try installing the oil filter with the gasket, spring and cover all at once.
19. Insert and hand-tighten (snug up) the oil filter cover bolts, and then in a diagonal pattern, tighten them the rest of the way. I do this in stages: I torque them all about half way, then finish tightening them. Do not over-tighten. The 2012 CBR250RA owner's manual specifies a torque value of 12 N.m (9 lbf.ft) for the oil filter cover bolts. The factory service manual specifies this same torque value for a 6 mm flange bolt (8 mm head, large flange) and nut (clean, dry, oil-free). If the threads of the bolts or holes have oil on them, and you torque to spec, you risk over-torquing the bolts. I typically torque the oil filter cover bolts to 10 N.m.
20. If you haven't already cleaned the oil filler opening, do so now, then pour clean motorcycle engine oil into the oil filler hole (you may want to use a clean funnel), and watch the level in the sight glass as you do so. For the oil level in the sight glass to be accurate, the bike must be completely upright (vertical) and on level (horizontal) ground. You can have someone hold the bike vertical, use a bike stand, or repeatedly add some oil and then stand the bike up vertical and check the level. You can also place a wood block under the side stand so the bike is almost vertical and then add oil until it maybe reaches the low-level mark (depends on how close to vertical the bike is) and then stand the bike up to verify the oil level. The level in the sight glass should be between the upper and lower marks and up to the upper mark. Do not overfill. If you do overfill, you can drain some oil out carefully through the oil drain hole, or you may be able to suck some out through the filler hole with tubing and a syringe. Provided that you have replaced the oil filter, the oil level tends to drop a bit after running the engine due in part to the filling of the oil filter cavity. So, if the oil level is a bit above the full mark before running the engine, it may be fine.
A too high oil level may affect the overall engine performance and actuation of the clutch (according to the Honda Common Service Manual). Also, if the oil level is too high the oil can become aerated (air bubbles in it) which could impact the engine lubrication system. If the oil level is too low, premature engine wear and overheating may result.
21. Reinstall the oil filler cap (apply oil to the O-ring).
22. Do the oil level check and check for leaks. With the motorcycle resting on the side stand on level (horizontal) ground, start the engine and let it idle for about 15 seconds and then turn it off. Wait for about 3 minutes. With the bike held upright (vertical) on level (horizontal) ground, check the oil level window. The oil level should be between the upper and lower marks. If the oil level is low, remove the oil filler cap and add oil up to the upper mark. Do not overfill. Reinstall the oil filler cap if you removed it to add oil. Now start the engine again and let it idle for about 3 minutes and then shut it off. Wait about 3 minutes and check the oil level again. Add oil up to the upper oil level mark if low (again, do not overfill).
23. Clean off any oil dribbles and oil residue off the engine or elsewhere.
24. Install the lower cowling (CBR250R/RA).
25. Install the middle cowling (CBR250R/RA).
26. Clean up. Dispose of the used engine oil and oil filters in a responsible way (recycling depot or some automotive service centres).
All done!
Previous