Introduction to Motorcycle Maintenance - Page 3
Page Last updated: Dec 22, 2023Fasteners
Consult your owner’s manual and / or service manual for what nuts, bolts and other fasteners are important for either your safety and / or to maintain your motorcycle in proper working order – the ones that should be inspected and checked for proper torque.
As stated in the tool section, if you look up the torque values for fasteners on your motorcycle in your service manual, there may be a table of torque values for common bolt sizes. The bolt size refers to the outside diameter of the bolt shank (the smooth portion of the threaded part), and not the size of the bolt head (the tool size used).
Some of the common bolts to check include axle nuts, pinch bolts, fork clamp bolts, handlebar mounting bolts, caliper mounting bolts, exhaust mounting bolts, foot peg mounting bolts, gear shift lever and brake pedal mounting bolts.
Controls and Cables
Refer to the owner’s manual or service manual for proper operation, adjustment and servicing. Controls also include the associated cables or brake lines. Cables should be inspected regularly for damage, kinks or deterioration. Cables should be evaluated for smooth operation and should be lubricated occasionally (you can buy cable lubricant, or use a thin oil). I’ve heard that WD-40 should not be used as it can damage the Teflon layer inside the cable. I don't know if that is true or not. Damaged or deteriorated cables should be replaced.
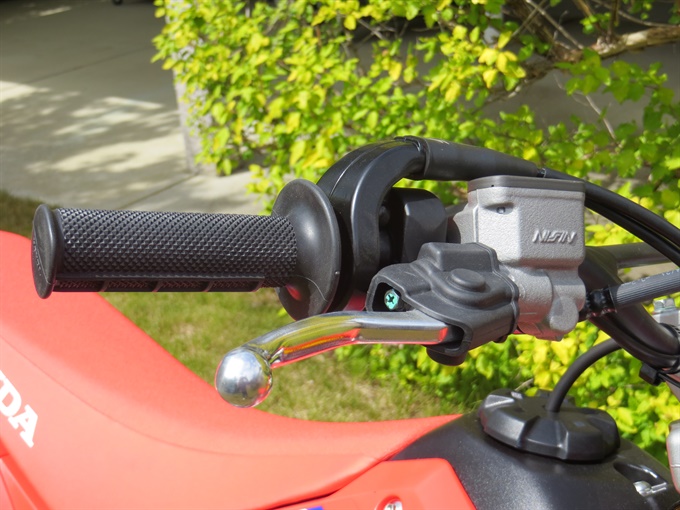
Controls that should be checked and possibly adjusted include the clutch lever position and free play, throttle operation (at the grip) and free play, front brake lever position, free play and feel (firm vs mushy), rear brake pedal height position, free play and feel. Typically, there are adjustment screws and locknuts at the controls for adjusting the free play and possibly the position. Cables often have adjusters inline or at the carburetor/throttle body or at the clutch external actuating mechanism. Some levers are also adjustable for reach to accommodate different hand sizes. Pivot points also require lubrication.
Some motorcycles have a hydraulicly operated clutch instead of using a cable. Also, some motorcycles may have a “ride by wire” throttle instead of using a throttle cable (or cables).
Ensure that the shift lever is tightly mounted on the associated splined shaft. Any free play here may result in damage to the splines of the shift lever or the shaft. If the shift lever mounting has loosened up, completely remove it and clean the splines of the shaft and shift lever well and then reinstall; tighten the bolt adequately (refer to the service manual for torque specification for the clamping bolt. If the splines of the shift lever are worn, you may have to replace the lever. If the splines on the shaft are severely worn it may need to be replaced.
Lubrication of Pivot Points
Pivot points need to be lubricated from time to time to ensure smooth operation and to prevent premature wear. These items include such things as the brake lever, clutch lever, rear brake pedal, drum brake activating mechanism, foot peg mounts, side stand and center stand pivots / mounts, gear shift linkage, etc. Some pivots may require a specific type of lubricant.
Lights, Horn and Switches
Check that all the switches and buttons operate properly and the items they control function correctly. You can often improve the operation of switches by opening up the assembly and cleaning and possibly lubricating the moving parts. There may be corrosion on the contacts too; those can be cleaned up as well. Replace burned out bulbs or parts that cannot be revitalized.
There is usually a safety switch in the clutch lever assembly that prevents the starter motor from working when the motorcycle is in gear and the clutch lever is not pulled in. Sometimes that switch may not work correctly. Often there is a similar safety switch for the side stand which prevents the motorcycle from being ridden if the stand is down. Pay attention to those switches as well.
Inspection of Wiring, Electrical Connectors and Other Parts
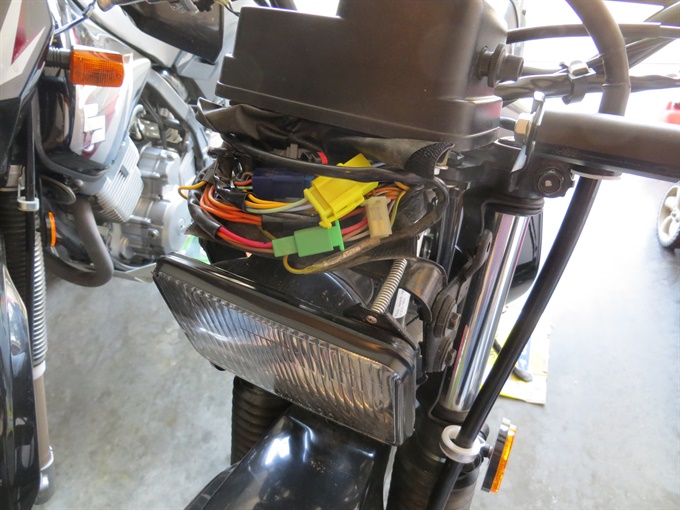
Inspect the wiring and connectors for corrosion, breaks and damage to insulation. You may be able to use quality electrical tape or shrink wrap/tubing to repair damage to the insulation (depends). Ensure that wiring is routed properly and is not being subjected to wearing on other parts of the motorcycle. Any frayed or broken wires should be properly repaired (replaced). While you’re at it, examine other parts of the motorcycle for anything that looks like it needs attention.
Brakes
The brake system includes the master cylinders, brake lines, calipers, brake fluid and ABS (antilock braking system) if so equipped as well as the activating controls. On some motorcycles, the front and rear brakes are integrated or linked, especially if the bike has ABS. Drum brakes are not that common on new motorcycles except small, more entry-level bikes; they also tend to be operated mechanically rather than hydraulically. I will limit the maintenance discussion to a few aspects: brake lines, brake fluid and brake pads or shoes.
Brake fluid needs to be replaced regularly because it absorbs water and deteriorates. Replacement of brake fluid improves braking performance and helps reduce deterioration of other components of the brake system. Air in the brake system can compromise braking performance too as air is compressible, whereas brake fluid is not. If your brakes feel mushy at the levers, it is likely due to air in the system. If your brake fluid has absorbed water, then under very heavy brake use, the brake fluid can become hot enough in the calipers to cause the water in the brake fluid to release from the fluid in the form of bubbles of vapor resulting is decreased braking feel and performance (water vapor is compressible). The water can also lead to corrosion in the brake system. If a certain amount of time has lapsed (typically 2 years), or if the brake fluid appears to have gotten darker, then the brake fluid should be replaced. If the brake fluid is still light or has been replaced not that long ago, and the brakes feel mushy, then there may be air in the system which can be removed by bleeding the brakes which eliminates the air. It may be advisable to replace the brake fluid more frequently on some bikes or under more severe conditions.
Brake lines should be inspected regularly for damage or deterioration. Damaged or deteriorated brake lines should be replaced. Your owner’s manual may state that brake lines should be replaced every so many years. The service life of brake lines likely depends on the type, the use of the motorcycle and the environment that it is used and stored in. The recommended replacement frequency interval is also likely influenced by liability of the manufacturers.
Brake pads and shoes wear out, and when they have nearly done so, they need to be replaced. Brake pads often have wear indicators (grooves) in them to help let you know when they need replacing. If there are no wear indicators, then you’ll have to rely on the remaining pad thickness to determine if it’s time to replace them. Drum brakes will have an indicator on the actuating mechanism to show when the brake shoes need replacing.
You will have to unbolt the brake caliper(s) from the forks or remove the wheel(s) in order to replace the brake pads. If removing the calipers from the forks, use something to suspend them so that weight is taken off the brake lines. Do not squeeze the brake lever or press on the brake pedal when the brake disk is not between the brake pads or you risk forcing the caliper pistons out of the calipers. Brake pads are forced against the brake disk by the caliper pistons due to brake fluid pressure created by the master cylinder when the brake lever is squeezed or the rear brake pedal is pressed. The system compensates for wear of the brake pads, so when replacing worn pads, you need to force the caliper pistons back into the calipers a bit so that after the new pads are installed, there is enough clearance for the brake disk to fit between them. You can force a screw driver between the old pads while they are still in the caliper to force the pistons back into the caliper a bit (there are also special tools for this). Note, that when the caliper pistons are forced back in, brake fluid is forced out of the calipers, and the brake fluid needs somewhere to go, so you can let that excess fluid out through the master cylinder (remove the cover, and suck some fluid out with a syringe) or the brake bleeder valve (attach a clear tight-fitting tube and open it slightly) on the caliper. If you're replacing the brake pads, you might as well replace the brake fluid (and bleed the brakes) at the same time.
To replace brake shoes in a drum brake, remove the wheel and then the outer hub to access the internal braking mechanism. Drum brakes on motorcycles are usually mechanically operated rather than hydraulically. Do not used compressed air to blow out the assembly; wipe out only. Avoid inhaling brake dust (wear a mask or respirator). Apply a small amount of grease to the pivots and cams.
To bleed the brake system, or to replace the brake fluid, you’ll need fresh brake fluid of the correct type (usually DOT 3 or DOT 4; refer to owner's manual or master cylinder cover) from a sealed container, a section of clear tubing with an inside diameter corresponding the size of the brake bleeder valves on the brake calipers. The tubing should fit tightly so that fluid or air cannot pass where they make contact. You’ll need a container for the old brake fluid, and the other end of the tubing should reach the bottom. The container should be heavy enough that it won’t accidently tip over. I use a large glass jar. You may need an assistant to help you bleed the brakes: one person working the brake lever and the other person opening and closing the brake bleeder valve.
Note that brake fluid will damage surface finishes like paint, so protect areas with rags etc., and cleanup any spilled brake fluid immediately with wet rags or rinse with water.
Turn the handlebars (for servicing the front brake) so that the master cylinder is level. Remove the cover and diaphragm from the master cylinder or brake fluid reservoir. If replacing the brake fluid, suck out as much brake fluid as you can with a syringe, then fill up the reservoir with fresh fluid. You are going to pump brake fluid from the master cylinder (reservoir) and out the brake bleeder valve, so keep an eye on the fluid level in the reservoir and add fluid as needed to avoid pumping air into the system. Basically, what you do is squeeze the brake lever and while keeping pressure on it, open (about a 1/4 turn, so it’s no longer seated) and then close the bleeder valve. Do not release the brake lever before closing the bleeder valve or you will introduce more air into the system (more work). You do this repeatedly until no more bubbles are visible coming out the caliper (this is why you want clear tubing), and if replacing the fluid, fresh (light-coloured) fluid is visible. When done, tighten up the brake bleeder valve to the proper torque and reinstall the master cylinder (or reservoir) cover and diaphragm. Cleanup any brake fluid spills or residue. It’s a similar procedure for the rear brake, only you’re pushing down on the brake pedal. Dispose of the used brake fluid responsibly.
If your bike has ABS then there may be a certain order in which you need to bleed the system (by which I mean the order of valve bleeders that you bleed the system from).
There are aftermarket brake bleeder valves that replace the stock bleeder valves that can (supposedly) make the process easier. There is a brake bleeder tool from Motion Pro that combines a check-valve (one-way valve) and tubing with a wrench; it works with the stock brake bleeder valves. And finally, there is also brake fluid evacuation devices that can be used which essentially suck the brake fluid out of the system (should make replacing brake fluid easier and faster, especially if installing new brake lines). I just use the manual technique.
Next: Tires, WheelsPrevious Page: Common Maintenance Tasks
Back to Page 1