Introduction to Motorcycle Maintenance - Page 4
Page Last updated: Dec 22, 2023
Tires
The condition of the tires on your motorcycle greatly impacts your safety, so it’s important to inspect them regularly. Check and adjust the tire pressures, and look for cracks, cuts, embedded objects, excessive or uneven wear. Tires have a limited lifespan (max 10 years from the date of manufacture), after which they should be replaced even if they have not worn out (tires have wear bars or indicators). There is a 4-digit number molded into the side of the tire; the first 2 digits correspond to the week and the last two digits refer to the year. For example, 1219 refers to the 12th week of 2019. Severely damaged, deteriorated, hard or worn tires should be replaced.
Some motorcycle tires are directional: they must be mounted so that they rotate in one direction (when riding). If the tire is directional, there will be some kind of marking (may be subtle or obvious) on the tire to indicate the proper rotational direction. Many tires, if not most, are position specific in that they are suitable for use on either the front or the rear but not both.
Tire repair (flat tires)
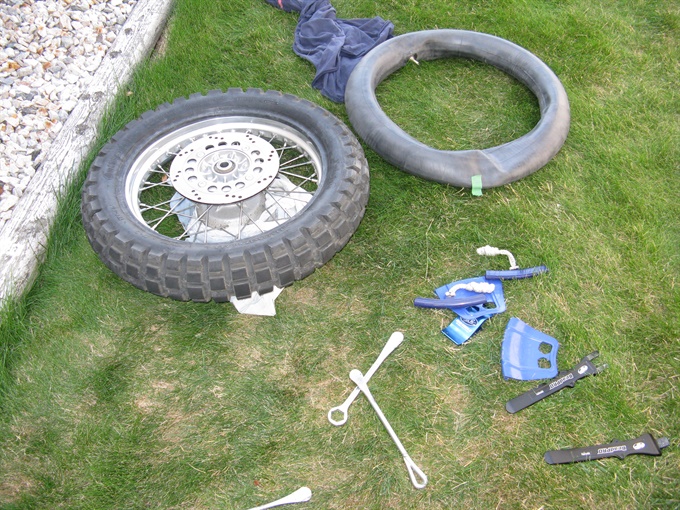
It may be possible to repair a flat tire depending on the location and size or severity of the damage. A temporary fix to a puncture in the tread area of a tubeless tire can often be made by plugging the hole from the outside, but a more permanent repair should be made by removing the tire from the rim and repairing the hole in the tire from the inside.
Simple punctures in tube type tires can also be repaired, but in this case, the damaged inner tube must be removed and either patched or replaced. You’ll need some way to safely prop up the bike in order to remove the wheel; on the road or trail this can be done with a center stand, trail stand, a rock, a log, securing the bike to a tree in conjunction with the side stand, etc., and at home you can use a bike stand, jack or lift. Cuts and punctures in the sidewall of a tire are generally not repairable (an exception might be a small puncture in the sidewall of a tire on a dirt bike).
If you have a tiny hole resulting in a slow leak, you may be able to repeatedly add air to the tire (if you brought a pump with you) to get yourself home; otherwise, you may have to fix the flat roadside or trailside. You might be able to limp along for a while if your tire has a real stiff sidewall and/or the wheel has a rim lock. On light bikes you may be able to use several zip ties to hold the tire to the rim so you can ride cautiously at very slow speed (this mainly applies to dirt or dual sport bikes) to get to a place where you can load up the bike in a truck or do a proper repair.
To remove a tire for repair or replacement, you’ll need to have the necessary tools available. You will need tools to remove the wheel as well as tools to break the tire bead (may not be necessary, depending on the tire) and tools to remove the tire (or one edge) from the rim. If you’re going to repair a tire or tube, then you will also need a patch kit. If your motorcycle has tube type tires then I suggest you pack spare inner tubes, a patch kit and tire changing tools. Removing and mounting a tire is easier if the tire is warm because it will be more pliable / less stiff. You can warm a tire by setting it out in the sun or with a hair dryer. I've replaced a tube in a tire that was cold and stiff, and it took a lot of effort. Warm and flexible tires are a lot easier.
After removing the wheel, put the wheel on top of a cloth or ground sheet so you don’t get dirt or other debris inside the wheel bearings. Also, start breaking the bead on the sprocket side of a rear wheel, flip it over and break the disk side bead and lever off that side; this is to protect the disk as well as reducing the chance of injuring your hands on the sprocket when using tire levers or spoons. For a front wheel with a single disk, lever off the disk side of the tire (disk on top). If you have a front wheel with dual disks, just be careful not to put a lot of pressure on the disk on the ground if you can avoid it. I also put a plastic bag over the sprocket to help keep everything cleaner including me.
For a tube-type tire, the process for repairing a flat tire, after first removing the wheel, is basically this: let out any remaining air through the valve (remove the valve core, or just release the air through the valve), remove the nut holding the valve stem in place, loosen up the rim lock if there is one (back off the nut to the end, but don’t remove the nut, then push the bolt into the rim), break the bead of the tire on both sides using a bead breaker, tire levers or spoons, stepping down on the tire while it is flat on the ground, or using the side stand of another bike to press down on the side of the tire on the ground. While holding one edge of the tire down in the center part of the rim with your knees and/or a Bead Buddy, lever off one side of the tire starting on the side opposite you, working your way around bit by bit (take small bites) until the tire is over the rim. The use of rim protectors will help reduce marring of your rims when using the levers or spoons.
After getting one side over the rim, pull out the inner tube. Patch the tube (follow the instructions in the repair kit) and reinstall the valve core if it was removed, or replace the tube with another one. Add some air to the tube (just enough to hold its shape) before inserting it into the tire. Start with getting the valve stem in place and then put the nut on it to hold it in place. If there are two nuts on the valve stem, one nut goes inside the rim and the other goes outside the rim.
Push the side of the tire closest to you (and near the valve) down into the center of the rim and hold it there with a Bead Buddy and/or your knees (this is important), and then push as much of the tire over the rim edge bit by bit starting on the side closest to you. Especially with a stiff tire, also keep the tire bead on the underside of the tire in the drop zone (center part) of the rim. You can repeatedly lift up on the underside of the tire with your fingers to keep it in place or you can use something to act as a spacer between the rim edge and the tire bead. Use the tire levers or spoons (with rim protectors if you have them) to continue the process until the tire is completely on. Keep the tire pushed into the center of the rim during this process. Be careful not to pinch the inner tube when using the tire levers or spoons (try not to go past 90 degrees to the plane of the wheel with the lever). Air up the tire until the bead seats. It will be easier if you wet the tire bead with water, bead lube or slightly soapy water. Check for air leaks. Adjust the tire pressure, tighten up the rim lock if there is one, and put the wheel back on the motorcycle.
You may want to back off the valve stem nut. The idea is that if the tire rotates a bit on the wheel, the valve stem may tear if held firmly in place because of the valve stem nut. This should only happen if the tire pressure is low and there is no rim lock or the rim lock has not been tightened up, but better safe than sorry.
It has been recommended that you put baby powder in the tire and on the inner tube before installing the tube in the tire. The purpose is to reduce friction between the tire and the tube. These days (at least in Canada) most baby powder contains corn starch instead of talc. I would not use corn starch in my tires because water can get inside the tire around the spokes. It seems to me that starch plus moisture may lead to mildew growth in the tire which wouldn’t be nice especially the next time you change the tire; it might also be a health issue. If you can’t find baby powder with talc, try to find some foot powder with it or look for tire talc (check at a tire shop). Maybe exercise some caution and try not to breath in the talc dust.
Wheels
Inspect the wheels for cracks or dents or other deformities. Small dents in the rim of a spoked wheel might be repairable. Spin each wheel by hand while the wheel is suspended off the ground and look for signs that the wheel is warped or out of round. A spoked wheel can often be corrected by adjusting the spokes. When a wheel is removed for replacing a tire or other maintenance, check the wheel bearing by inserting your finger into it and turning it; feel for any looseness or “notchy-ness” which would indicate that the bearings are worn and need replacing. When a wheel is removed, apply a thin coat of multipurpose grease to the axle to prevent corrosion and to facilitate easier removal in the future. If the rear wheel is removed, also check the condition of the rubber blocks of the cush drive, if your motorcycle is so equipped. Cush drive is like a shock absorber for your drive train.
Wheel Balancing (new tire install)
If mounting up a new tire, look for a dot painted on the side of the tire indicating the lightest part of the tire. If a dot is present, align the dot with the valve stem. This will reduce the amount of wheel weights necessary to balance the tire/wheel assembly. If your motorcycle will be ridden at higher speeds, the wheels should be balanced, otherwise you may experience a lot vibration from the wheel; the handling may be affected too. Most street bikes will have their wheels balanced, but smaller dual sport motorcycles often don’t and dirt bikes usually don’t.
It’s easy to balance a wheel once removed from the motorcycle. You don’t absolutely need any special tools or equipment, but you will need some way of supporting the wheel off the ground (off the motorcycle) that allows you to rotate the wheel on the axle, and you will need some wheel weights (I use steel stick-on weights; you can buy them from motorcycle supply stores and maybe from tire or bike shops). There are wheel balancing stands available that may enable you to more precisely balance the wheel, but you can use automotive axle stands or blocks of wood to support the axle ends (insert the axle through the wheel). Do not try to balance the wheel while it is on the motorcycle because of brake drag (you could remove the brake calipers); if the chain is on the sprocket, then obviously that will prevent the rear wheel from freely rotating too. On the front wheel of some motorcycles there is also a drive gear for the speedometer which would also impede free rotation of the front wheel if the wheel is on the motorcycle.
Once set up, slowly spin the wheel and let it rotate freely until it stops, then mark the top of the tire with a piece of tape; this is the lightest point. Rotate the wheel in the opposite direction to check the location of your tape. Check multiple times. You’re looking for consistency. If the tire stops in multiple places, the wheel is likely close to being in balance, otherwise tape some wheel weights to the rim and spin the wheel again. If the weighted part of the wheel stops at the low point, then there is too much weight, and if the opposite is true, then there is too little weight. Adjust the weight and repeat. After determining the correct amount of weight to add, stick the weights to the rim with the adhesive backing (stick-on weights) or by the appropriate method for the weights you have.
Next: Chain, Sprockets, ...Previous Page
Back to Page 1
Back to list of Common Maintenance Tasks