Introduction to Motorcycle Maintenance - Page 6
Page Last updated: Dec 22, 2023
Checking the Steering Head Bearings
You may need an assistant for this. The front wheel needs to be suspended off the ground in order to check the steering head bearings. Grab the forks and try to move the front-end assembly front to back to check for any free play; there shouldn’t be any, but if there is, then the steering head bearing may need to be tightened up (there is a specific procedure for this; consult your service manual or a bike shop). Now turn the steering back and forth; it should be smooth, but if it isn’t, the steering head bearings may need servicing or replacement. There should be a very small amount of resistance (see your service manual), but if the steering is tight, then the steering head may need a slight adjustment (see service manual or bike shop).
Front Suspension
The front suspension needs to be inspected from time to time. The forks should compress and extend smoothly. On a new motorcycle, the forks may stick slightly until they’re worn-in a bit, but they shouldn’t bind.
Inspect for scratches on the inner fork tubes and for oil leaks. A slight amount of oil may not be serious and may result from dirt getting into the seals. It may be possible to clean the seals without removing them. There is a tool that you can buy and use for this (it’s basically a very thin piece of plastic with a bit of a hook to catch dirt). If there is a lot of oil leaking from the forks, and cleaning didn’t solve the problem, then the fork seals may have to be replaced.
Scratches or corrosion on the inner fork tubes can cause damage to the fork seals or permit oil to escape. You might be able to gently remove very small scratches and corrosion with very fine emery cloth (be careful not to cause more damage, though).
If you’ve removed the front wheel for maintenance, you may have to ensure that the forks are properly aligned so that they move up and down freely again. On a DR650, the procedure is to first tighten the front axle nut to the proper torque, then push the forks up a down a few times, and finally tighten up the axle holder nuts.
The fork oil may need to be changed from time to time. Consult the owner’s manual or service manual for your motorcycle.
On some motorcycles the front suspension can be adjusted for spring preload, compression damping and/or rebound damping. Consult your owner’s manual.
Rear Suspension
Check for visible damage and oil leaking from the rear shock. The rear suspension linkage and swingarm pivot will require servicing from time to time to ensure longevity and proper operation and handling. Consult the service manual for your bike.
On some motorcycles the rear shock can be adjusted for spring preload (sag), compression damping and rebound damping. On the majority of motorcycles, the rear spring preload can be adjusted to compensate for varying loads.
Fuel System
Gasoline is highly volatile and dangerous. Handle in a well-ventilated area away from any source of ignition.
Look for fuel leaks and deterioration in fuel lines. Fuel leaks are dangerous and need to be remedied. Your owner’s manual may specify the interval at which the fuel lines should be replaced.
Remember to drain the carburetor (if applicable) if the bike is going to sit for a while, otherwise the carburetor may clog up and the bike may become difficult to start or may not run properly. If the bike has sat for more than 10 days and the ambient temperature is quite warm, I suggest draining the carb. If the temperatures are cooler, you may be good for a bit longer. This is also going to vary from bike to bike (different carburetors). If you think the bike isn’t going to be ridden for a while then drain the carburetor. There is a drain screw near the bottom of the carburetor. Catch the drained fuel and dispose of safely (I drain into a gas can). If the carburetor does not have a drain tube attached, you can add one to make things easier (get tubing from a hardware store or bike shop).
If the bike is going to sit for a very long time (months), add fuel stabilizer to the gas in the tank and slosh it around by rocking the motorcycle with the gas cap in place, and then run the stabilized fuel through the fuel system (drain carb, fill and then drain again or run/ride a fuel injected bike for 10-15 minutes or so). Ethanol in gas can cause problems in fuel systems, especially if the motorcycle sits for a long time. Ethanol-free gas may be available in some regions (at Chevron stations in Western Canada).
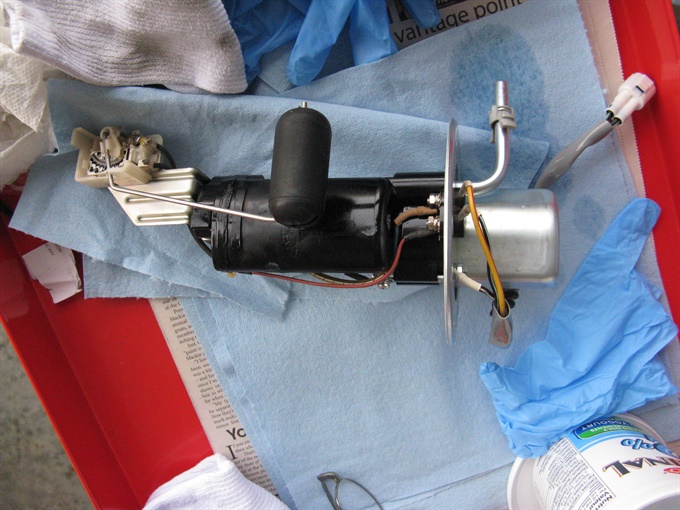
If you have a fuel injected motorcycle and you notice that the fuel pump is making a prolonged high-pitched whining noise (noisier than normal), the fuel pump filter may be clogged and need replacing (consult the service manual or take the bike to a shop). Some bikes may have an inline fuel filter that can be easily replaced; in others, the fuel filter may be part of the fuel pump in the gas tank. Bikes with carburetors may also have an inline fuel filter in addition to a small screen in the fuel tank as part of the petcock (fuel shutoff valve). If you have a fuel flow problem (tank to carb), the screen may be clogged and need to be cleaned.
Fuel lines may need to be replaced from time to time because they can deteriorate. As an example, the Suzuki DR650SE service manual states to replace the fuel line every 4 years.
Cooling System
Some motorcycles are air cooled, some are air-oil cooled, and some are liquid cooled. An air-cooled engine dissipates heat via the cooling fins. The fins should be cleared of mud and other debris so that they are more efficient at cooling. An air-oil cooled engine uses an oil cooler (a small radiator with engine oil circulating through) in addition to having cooling fins.
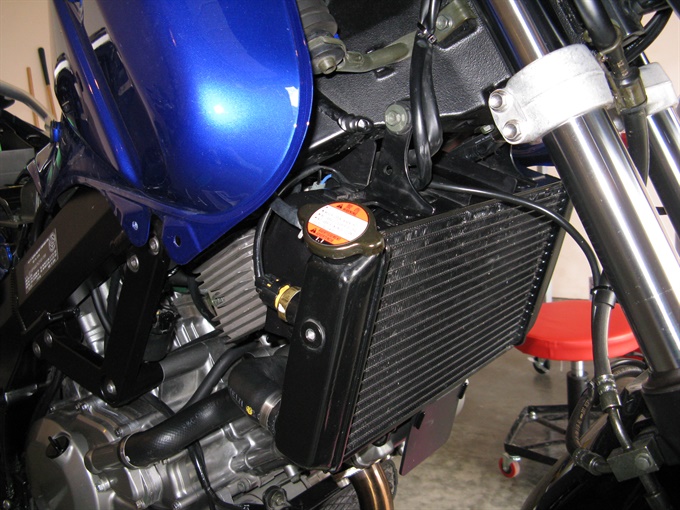
A liquid cooled engine has coolant (antifreeze / ethylene glycol) circulating through it and a radiator. The cooling system of a liquid cooled engine includes the radiator, thermostat, hoses, coolant reservoir, often a fan and the water pump. Check for coolant leaks. Check the coolant level in the reservoir, and top it up to the upper mark if low. Typically, a 50-50 mix of antifreeze and distilled water is used (you can buy premixed as well). Replace coolant every so often (see owner’s manual or service manual).
Replacing the coolant is pretty easy to do. Do not remove the radiator cap when the engine is hot; there is a risk of scalding yourself if you open it when the engine is hot. There is often a weep hole on the water pump, and if it starts leaking a fair amount of coolant that would be an indicator that the mechanical seal inside (or whole the water pump) needs replacing. A little bit of coolant weeping (or the presence of coolant residue) from the hole is normal; if it’s continually streaming out while the engine is running, then you have a problem.
To replace the coolant when the engine is cold, place a drain pan under the engine where the coolant drain hole/bolt is situated, remove the radiator cap and then remove the drain bolt. Afterwards reinstall the drain bolt. Now drain the coolant reservoir (rinse it out with water, finishing with distilled water if there is debris in it). Pour fresh coolant into the radiator up to the filler neck and install the radiator cap securely. Fill the coolant reserve tank with coolant to the upper fill mark. Now you will need to bleed the air out the cooling system.
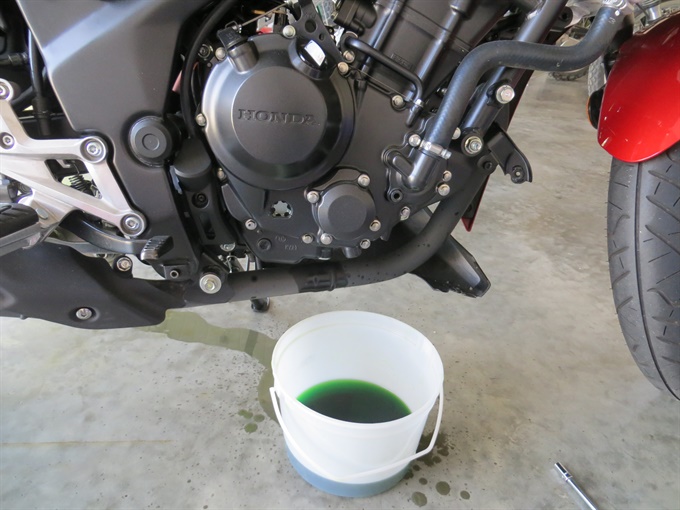
To air bleed the cooling system, let the engine idle for 2 to 3 minutes, and then blip (snap) the throttle a few times. Stop the engine, remove the radiator cap and top up the coolant level to the filler neck. Install the radiator cap securely. Check the coolant reservoir and top up to the upper-level mark if it is low. Dispose of used coolant at a recycling facility.
If your motorcycle has a radiator (or radiators), inspect the radiator fins for obstruction and damage. Bent radiators fins can often be straightened with a small bladed screwdriver (or a special tool), but be careful not to cause more damage. Debris can also be removed with a screwdriver.
Next: Air Filter, BatteryPrevious Page
Back to Page 1
Back to list of Common Maintenance Tasks