Introduction to Motorcycle Maintenance - Page 7
Page Last updated: Mar 25, 2025
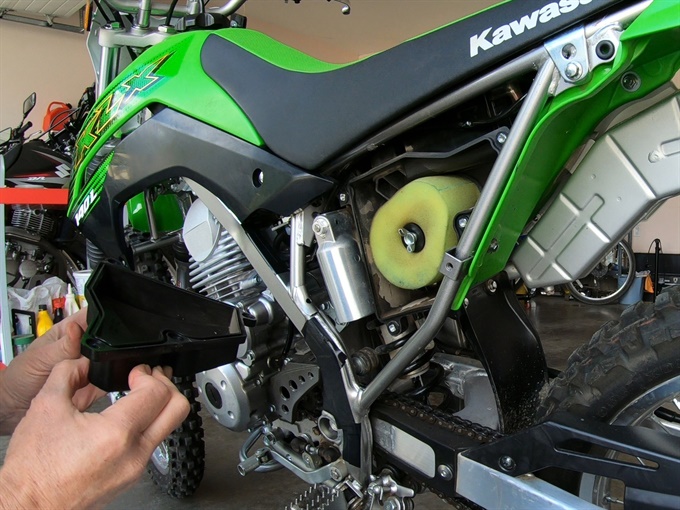
Air Filter
2020 Kawasaki KLX140L Air Filter Service2010 Suzuki DR200SE Air Filter Service
Your air filter needs to be inspected frequently if riding in dusty conditions. If you ride only on pavement, then you don’t need to inspect it nearly as often.
If the air filter is really dirty, then it needs to be cleaned (or replaced). If there is any damage or degradation to the air filter then replace it. If a foam air filter is dry, then it will also need to be serviced.
Before removing the air filter, clean around the area so that dirt will not fall into the clean side of the air box, air intake and carburetor when the air filter is removed.
You may be able to blow out a removed paper type air filter with compressed air if it’s not too bad (blow from the clean side); otherwise, you’ll need to replace it.
Foam type air filters can be cleaned, but they eventually degrade and need to be replaced. Foam air filters are supported by an internal frame which is removed from the air filter prior to cleaning the foam filter.
In the past (still an option today), cleaned foam air filters were soaked in clean motor oil and the excess was squeezed out. Today there are special purpose foam air filter “oils” or products available (they leave a sticky residue in the foam of the filter). I put oil in quotes because some air filter "oils" are not actually oil-based. Air filter oil comes in either a bottle or a spray can. Depending on the type of air filter oil you’re using, you will use either a special detergent or a solvent such as kerosene to clean the filter when it becomes dirty (consult the directions on the air filter oil container). Do not use gasoline to clean a foam air filter because it can degrade the foam, as well as being hazardous to use.
It should be noted that motor oil has some advantages over some special purpose air filter oils. A foam air filter soaked in motor oil will keep filtering out dirt even when extremely dirty; the oil soaks into the outer layer of dirt and new dust sticks to that oily dirt. Motor oil may also be less expensive than special air filter oil. A foam air filter that has been coated with some air filter oils may dry out and become less effective at filtering out dust putting your engine at risk. Some people use a mixture of motor oil and air filter oil provided that the air filter oil is in fact oil-based (some are not).
After the initial cleaning, squeeze out as much of the cleaning detergent or solvent as possible, but don’t twist or wring-out the air filter (you might create tears in the foam if you do). If using a solvent to clean the filter, you can wrap the filter in a clean rag or shop towels and then squeeze it some more to get rid of as much solvent as possible, and although not absolutely necessary, you can then let the filter air-dry in a well-ventilated area protected from direct sunlight (maybe for a day or so). After cleaning the air filter in kerosene (and maybe air drying), wash the air filter in mild soap and water and then rinse well with water. If using a special, water-soluble detergent (instead of kerosene) to clean the filter, also rinse out the filter well with water afterwards (consult the directions on the container). Finally, let the foam air filter thoroughly dry (protect from direct sunlight, and don't use heat).
When re-oiling the clean and dry foam air filter, follow the instructions on the air filter oil container. Generally you either spray or pour the air filter oil onto the foam air filter evenly and thoroughly, and then work the filter oil into the foam by massaging the filter. If using motor oil, you may want to pour some oil into a container just big enough for the air filter, and then soak the air filter in it. Don't leave any dry spots. You can wear gloves or put the air filter in a clean plastic bag (zip-lock bag) to keep your hands clean. Ensure that all the foam is well coated. If you used a large amount of filter oil (or motor oil), try to squeeze out the excess (again, don't wring-out or twist the filter). Once done, install the air filter frame into the air filter element.
Before reinstalling the air filter in the air box, make sure that no dirt has gotten into the clean side of the air box; carefully clean the area if necessary. Coat the sealing surface (where the air filter and air box make contact) of the air box with grease (if using an oil-based air filter oil or motor oil) to prevent dirt from getting past; you can apply grease to the sealing edge of the foam filter too. If you're using a non-oil-based air filter "oil", then you'll likely need to use a special "grease" that is compatible with it.
Battery
There are 4 types of motorcycle batteries: conventional lead-acid, AGM (absorbent glass mat), gel and lithium. Only the conventional lead-acid batteries will require maintenance (other than charging) which involves checking the acid level and, if low, adding distilled water to it. The other batteries are sealed (from the factory or after activation).
The batteries that come with most new motorcycles don’t require much maintenance other than connecting them to a battery charger during a period of storage; these are the sealed-type batteries. I remove the AGM batteries from my motorcycles at the end of the riding season and charge them once a month. They tend to last several years. Use a motorcycle battery charger. Lithium batteries may require a special battery charger than the one used for a lead-acid battery.
Buying a replacement battery
If you need a new battery for your motorcycle, don’t buy the replacement as a number part from the motorcycle distributor (for example, don’t buy a battery for your Honda from Honda via a dealer) without at least checking the price for the same battery from a different supplier. There can be a large price difference for the exact same battery (same battery manufacturer, like Yuasa, and same model or part number). You can often order a replacement battery for your motorcycle online or check with your local dealer.
Activating an AGM battery
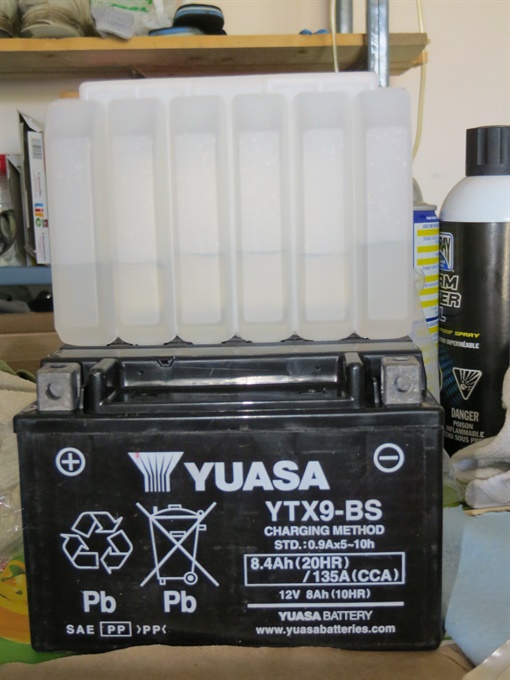
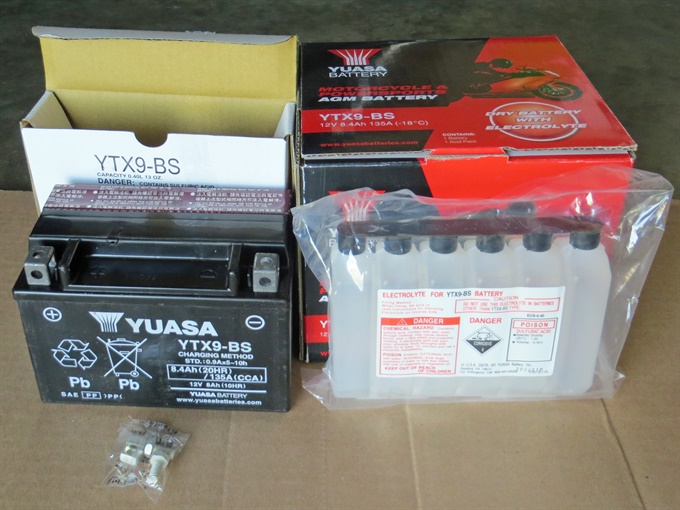
If you buy a replacement AGM type of battery, the battery will come with a sealed acid pack. These batteries with the sealed acid pack can be shipped through the mail in Canada. It is very easy to add the acid to the battery and then seal the battery afterwards. There is no pouring or measuring of the acid; you just invert the acid pack, align the foil-covered cell ends with the holes in the battery and press down firmly. The battery pierces the foil covers of the cells in the acid pack and the acid flows into the battery cells. When the acid has finished draining into the battery (give it about 20 minutes), tap the acid pack and then pull it straight up and off. Let the battery sit for about another 20 minutes. Finally, insert the battery cell sealing strip, pressing hard and evenly until its flush with the top of the battery. Check the voltage of the battery with a multi-meter to see if it needs charging. It should typically be about 12.5 - 12.6 volts if fully charged. Charge the battery with a motorcycle battery charger if the voltage is low.
Disconnecting and connecting batteries
The rule is to disconnect the negative wire from the battery first, then disconnect the positive wire. When reconnecting the battery, connect the positive wire first, then the negative wire.
Charging a battery
Use a battery charger suitable for your battery. Connect the positive lead to the positive battery terminal and the negative lead to the negative terminal. Double check the connections, then plug the charger into to wall outlet. When a lead-acid battery is being charged, hydrogen gas which, is explosive, is produced. Charge the battery in a safe, well-ventilated area. When done charging, unplug the charger from the wall outlet first, then disconnect the negative lead and the positive lead.
Storing a battery
Store a battery in a cool, safe, dry place. Charge at least once a month. I remove the batteries from our motorcycles prior to storing them for extended periods (part of winterizing them at the end of the season).
Next: Engine Oil and Filter, Wiring, Spark PlugsPrevious Page
Back to Page 1
Back to list of Common Maintenance Tasks